Pages

Showing posts with label crafts. Show all posts

Thursday, 29 May 2014

Children's Garden Shade Ideas

As an adult, it's very easy and oh so relaxing to rest at the garden table with a glass of something, a book and, if shade is needed, a parasol. However, a child is less likely to want to rest at the boring table when a break is needed, so I've looked up a few cool ideas for kids to do so in the shade outside!

Hula Hoop Hideout

Firstly, there's this Hula-Hoop Hideout (courtesy of Alanna George's the Craft Nest). It's so simple!  All you need is a hula hoop (you can pick them up on Ebay for a decent price if you don't already have some), some sheets and some other craft basics.

Pin the sheet to the hula hoop using safety pins and then use some rope or twine to create a hanger to tie the hoop to a tree or similar. You can decorate the sheet as you like - ribbons, buttons, other material etc - ot leave it as it is. Then just tie it all to the tree, place cushions and blankets underneath and voila! A gorgeous shaded hideout in which the kids can rest. For the full instructions from the site, click here.

This could also work indoors once made, as a lovely bedroom den.  It's also transportable, if needs be, so could be taken to a picnic or similar!

Sunflower House

Another idea, but one that takes planning and time, as well as space, is to plant a sunflower house. Firstly, prepare the area by digging whatever shape you wish your house to be, planting the sunflower cuttings or seeds, and then, just wait!

You can keep it simple, just use the flowers and their supports as the walls and ceiling and add a few chairs, a table, etc - or you can go all out and create something amazing and magical! This person has added a white picket fence, gate and a letterbox!

Runner Bean Teepee

You can do something similar with runner beans too by creating a teepee.  Prepare the soil and arrange the bamboo canes/wicker sticks in a wigwam fashion, then just plant the seeds and wait.


Obviously, with these latter two, you'll have to keep an eye on them as they grow and ensure everything is where it should be - for example, leaving space for the door!

Thursday, 1 May 2014

Recycling Cereal Boxes to organise your Leaflets

Take away menus, appointment letters, school notes, business flyers, vouchers - they're a pain but so often, we need to keep them. Mine go on the fridge and stress the magnets I own to the max. In fact, I invested in some super strong ones as the paperwork has increased so much!

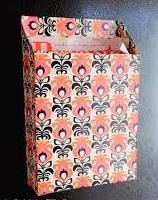
However, a much better trick to use is to recycle those cereal boxes once again - who'd have thought they could be so useful? Drawer organisers, box files - and now they could be used for paperwork storage!  Simply cut the cereal box (make sure it's the right size you need) so that the back is higher than the front and cover with scrapbook paper or other pretty paper of your choice.

Just inside each corner on the back, attach something nice that will compliment the paper and style you're after. These could be ribbons, bulldog clips, clothes pegs, string etc - and then stick magnets to these. Or you can get magnetic bulldog clips. Or you could just stick magnets to the back of each corner of the cereal box and not worry about extra embellishments! Your way is the right way. And there you go, a gorgeous way of organising that paperwork without the risk of it all falling down each time you open the fridge, all in one place and designed exactly to your taste. Simple!

If you want to take it even further organisation-wise, you could design and make file dividers for the inside of the box.

Hobby Warehouse

Sunday, 6 April 2014

Easter Holiday Ideas

So school's broken up for the Easter holidays and it's time to find things for the kids to do! I think that Easter is a great time to indulge in lots of crafty activities so my top tip today is to find which shops are offering special offers on Easter crafts and projects.

Hobbycraft have a good selection of items on offer at the moment and loads of kids' Easter craft items.  There's 3 for 2 on certain items such as scrapbooking paper, Hama beads and stickers.  There is 25% off Crayola.  There are half price art sets and craft trunks. There is buy one, get one free on Play-doh.  And Easter crafts start at jusyt £1. So basically, it would be really easy to stock up on a selection f Easter products to keep them amused for, ooooh, a few hours at least! And there will be some lovely items made at the end to give as gifts - or keep!


Friday, 4 April 2014

DIY Fabric Make-up Pads

I use a lot of disposable cotton wool pads to remove make-up, nail varnish, put on cleanser and toner and so on which isn't really very environmentally friendly.  So I've made some washable fabric pads which only took a little time, it will save me money and I can stop feeling guilty about not being green!

I used some spare flannel fabric that was in my sewing bag, nothing fancy. It can be cut into any shape you like; I did basic circles. I put a little more of the fabric in between two layers to bulk it up and sewed around the outside by hand - again, nothing fancy but enough to keep it all together snugly and for it to 'look' like a cotton pad.  And there it is - a reusable, washable pad for those particular beauty needs!  Next time though, I may try squares and use the sewing machine.


Friday, 28 March 2014

DIY Bath Bombs

I must admit, this post is mainly selfish as I plan to make these and don't want to forget where I found them.  But they are genius! They are fragranced bath bombs that you can make yourself, quickly, easily and cheaply.  The full instructions can be found on a website called 'Something Turquoise'.

All you need is to measure out baking soda (bicarbonate of soda), citric acid, witch hazel and whatever fragrance and colourant you like. Mix it all up till clumpy and firm.  Choose a mould - the developer of the bath bombs used a mini muffin tray. Pack in the mixture, leave for 10 minutes or so and then turn out on to wax paper to dry. They can then be used as gifts, wedding favours, or just keep them yourself!

Thursday, 23 January 2014

Great Value Valentine's Crafts

Yellow Moon is a crafting website that schools, clubs and charities can register with to get commission on any sales - organisations give out catalogues to parents, members, carers etc or people can order online.  There's a sale on site at the moment, so it is well worth a look to stock up on some crafty bits.

I always think it's so much nicer to give (and be given!) homemade gifts and, as Valentine's Day is coming up, I thought it would be nice to have a look at the site to see what's on offer.

First of all, I've spotted these cute Love Scratch Art Decorations which would be perfect to create something unique for a parent or special person.  They're reduced from £2.99 to £1.99.  My children would have so much fun making these!


These 'Design a Heart' keyring packs are lovely too, reduced from £3.99 to £2.99.  Again, kids could make something really individual, different and sweet for the occasion.


Finally, these Mosaic Heart coaster kits aren't on offer but they are awesome and can be treasured forever - and they're only £3.99.  I love the style and colours of them, kids will love making them and they are practical and pretty.


So find out your school or organisation's code so they can get some commission and get ordering!

Saturday, 12 October 2013

Recycling Cereal Boxes to make Box Files

I've been finding that, despite this whole idea of a paperless home and office, I'm getting more and more paperwork.  Letters from the kids' school, appointments, party invitations, vouchers, reminders - the list goes on!  Inevitably, I lose some of it - or it clutters up the house - so I have been looking at ways of keeping track of it in an efficient but pretty way.

One great tip I have found is to recycle old cereal boxes.  It's so simple!  Take an old cereal box and cut it into a box file shape.  I cut about two-thirds of the way down the side and the same again across the top.  If you want to be really precise, you can measure it and mark it up with a pencil, but I didn't find it necessary.


Next - decorate!  Choose any paper you like, be it specialist crafting paper or just simple wrapping paper, and glue it on.  What's also great about this is that you can use any size box you like, depending on what you're storing.  And there you have it - quick, easy, cheap, efficient and easy organisation!


Thursday, 10 October 2013

Recycling Cardboard Boxes to make Drawer Organisers

My underwear drawer was a mess.  But then I discovered a way to utilise all of those old shoe boxes I had hanging around, waiting for me to do something with them - use them as drawer dividers to create a cheap and easy way to organise my stuff!

Literally, all I did was to cut the boxes in half, either along the length or width to fit the space and fill each section with my socks, underwear and bras.  Quick, easy and cheap - and I can now find what I need without rummaging around every morning!  And if you want to make it pretty, it's easy to do with some lovely craft paper and glue.


You can do this with any drawer - it doesn't have to be underwear!  And I imagine any box will do - think cereal boxes as well....

Saturday, 5 October 2013

Earring Organiser

I've got a couple of great ways to recycle old bits and bobs to create a lovely earring organiser.

The first way is so super simple!  Just get an old cooling rack for cakes and voilá.  An earring organiser!  Just make sure it's criss-crossed to hook the earrings on, like this one from Amazon.  If you want, you can paint it, but I quite like the silver.  It's basic but it works.


A second, more project-based and potentially pretty one is to use an old photo frame and some wire.  Remove any backing and glass, so you're just left with the frame.  Attach the wire to the frame with some eyelet hooks, decorate the frame as you see fit and hang the earrings from the wires.  Or - even easier - attach some chicken wire or similar!

With both, you can attach it to the wall or just place on your dressing table or chest of drawers.

Saturday, 28 September 2013

Storing Ribbons for Craft Projects

One of the things I love about being a Mum is the excuse to get creative and crafty with the kids when I'm not very good at it!  However, I find that storing all the different bits tends to mean a vast amount of ugly clutter.  So for this blog, I will compile some savvy, simple and possibly pretty ideas to storage all your crafty bits - and probably other stuff too!

I've taken advantage of an idea to store ribbons - a lidded glass jar with the ribbons wrapped in lollipop sticks.  Any large jar will do, and it could be plastic, glass or any type that you feel looks good - but it obviously needs to be big enough to fit the wrapped sticks.  For this sort of thing, I tend to have a search on Ebay - I like this Biscotti jar:
Next, find some decent sized lolly sticks.  Again, I've found the best value ones are on Ebay - search for large or jumbo lolly sticks.
Then all you have to do is to wrap the ribbons round the lolly sticks, place in the jar and put on a shelf and you have a pretty, colourful and practical storage option!